Keras Upgrade
!pip install keras-nightlyCollecting keras-nightly
Downloading keras_nightly-3.6.0.dev2024101603-py3-none-any.whl.metadata (5.8 kB)
Requirement already satisfied: absl-py in /usr/local/lib/python3.10/dist-packages (from keras-nightly) (1.4.0)
Requirement already satisfied: numpy in /usr/local/lib/python3.10/dist-packages (from keras-nightly) (1.26.4)
Requirement already satisfied: rich in /usr/local/lib/python3.10/dist-packages (from keras-nightly) (13.9.2)
Requirement already satisfied: namex in /usr/local/lib/python3.10/dist-packages (from keras-nightly) (0.0.8)
Requirement already satisfied: h5py in /usr/local/lib/python3.10/dist-packages (from keras-nightly) (3.11.0)
Requirement already satisfied: optree in /usr/local/lib/python3.10/dist-packages (from keras-nightly) (0.13.0)
Requirement already satisfied: ml-dtypes in /usr/local/lib/python3.10/dist-packages (from keras-nightly) (0.4.1)
Requirement already satisfied: packaging in /usr/local/lib/python3.10/dist-packages (from keras-nightly) (24.1)
Requirement already satisfied: typing-extensions>=4.5.0 in /usr/local/lib/python3.10/dist-packages (from optree->keras-nightly) (4.12.2)
Requirement already satisfied: markdown-it-py>=2.2.0 in /usr/local/lib/python3.10/dist-packages (from rich->keras-nightly) (3.0.0)
Requirement already satisfied: pygments<3.0.0,>=2.13.0 in /usr/local/lib/python3.10/dist-packages (from rich->keras-nightly) (2.18.0)
Requirement already satisfied: mdurl~=0.1 in /usr/local/lib/python3.10/dist-packages (from markdown-it-py>=2.2.0->rich->keras-nightly) (0.1.2)
Downloading keras_nightly-3.6.0.dev2024101603-py3-none-any.whl (1.2 MB)
━━━━━━━━━━━━━━━━━━━━━━━━━━━━━━━━━━━━━━━━ 1.2/1.2 MB 21.8 MB/s eta 0:00:00
Installing collected packages: keras-nightly
Successfully installed keras-nightly-3.6.0.dev2024101603Letter recognition (small size)
Indeed, I once even proposed that the toughest challenge facing AI workers is to answer the question: “What are the letters ‘A’ and ‘I’? - Douglas R. Hofstadter (1995)
notMNIST
Data source: notMNIST (you need to download notMNIST_small.mat file):

some publicly available fonts and extracted glyphs from them to make a dataset similar to MNIST. There are 10 classes, with letters A-J taken from different fonts.
Approaching 0.5% error rate on notMNIST_small would be very impressive. If you run your algorithm on this dataset, please let me know your results.
So, why not MNIST?
Many introductions to image classification with deep learning start with MNIST, a standard dataset of handwritten digits. This is unfortunate. Not only does it not produce a “Wow!” effect or show where deep learning shines, but it also can be solved with shallow machine learning techniques. In this case, plain k-Nearest Neighbors produces more than 97% accuracy (or even 99.5% with some data preprocessing!). Moreover, MNIST is not a typical image dataset – and mastering it is unlikely to teach you transferable skills that would be useful for other classification problems
Many good ideas will not work well on MNIST (e.g. batch norm). Inversely many bad ideas may work on MNIST and no[t] transfer to real [computer vision]. - François Chollet’s tweet
!wget http://yaroslavvb.com/upload/notMNIST/notMNIST_small.mat--2024-10-23 04:32:40-- http://yaroslavvb.com/upload/notMNIST/notMNIST_small.mat
Resolving yaroslavvb.com (yaroslavvb.com)... 129.121.4.193
Connecting to yaroslavvb.com (yaroslavvb.com)|129.121.4.193|:80... connected.
HTTP request sent, awaiting response... 200 OK
Length: 117586976 (112M)
Saving to: ‘notMNIST_small.mat’
notMNIST_small.mat 100%[===================>] 112.14M 17.9MB/s in 7.9s
2024-10-23 04:32:49 (14.3 MB/s) - ‘notMNIST_small.mat’ saved [117586976/117586976]import numpy as np
import matplotlib.pyplot as plt
from scipy import ioData Loading
data = io.loadmat('notMNIST_small.mat')

data
{'__header__': b'MATLAB 5.0 MAT-file Platform: posix, Created on: Wed Aug 10 11:38:32 2011',
'__version__': '1.0',
'__globals__': [],
'images': array([[[ 0., 0., 0., ..., 0., 0., 0.],
[ 0., 1., 0., ..., 0., 0., 0.],
[ 0., 0., 0., ..., 0., 0., 0.],
...,
[255., 0., 215., ..., 0., 160., 124.],
[255., 0., 227., ..., 0., 122., 72.],
[255., 0., 156., ..., 0., 0., 12.]],
[[ 0., 0., 0., ..., 0., 0., 0.],
[ 0., 19., 0., ..., 0., 0., 0.],
[ 0., 93., 0., ..., 0., 0., 0.],
...,
[255., 0., 255., ..., 0., 255., 255.],
[255., 0., 110., ..., 0., 206., 227.],
[255., 0., 21., ..., 0., 0., 63.]],
[[ 0., 3., 0., ..., 0., 0., 0.],
[ 0., 167., 0., ..., 0., 0., 0.],
[ 0., 255., 0., ..., 1., 1., 0.],
...,
[255., 0., 223., ..., 1., 252., 255.],
[255., 0., 0., ..., 0., 192., 228.],
[255., 0., 0., ..., 0., 0., 68.]],
...,
[[189., 0., 138., ..., 0., 0., 0.],
[253., 0., 255., ..., 0., 0., 0.],
[251., 55., 255., ..., 1., 2., 1.],
...,
[ 0., 251., 0., ..., 1., 3., 255.],
[ 2., 255., 0., ..., 0., 0., 228.],
[ 0., 209., 0., ..., 0., 0., 70.]],
[[237., 3., 75., ..., 0., 0., 0.],
[255., 2., 64., ..., 0., 0., 0.],
[255., 0., 90., ..., 0., 0., 0.],
...,
[ 2., 254., 0., ..., 0., 0., 248.],
[ 0., 255., 0., ..., 0., 0., 203.],
[ 0., 99., 0., ..., 0., 0., 51.]],
[[ 99., 0., 0., ..., 0., 0., 0.],
[128., 0., 0., ..., 0., 0., 0.],
[154., 3., 0., ..., 0., 0., 0.],
...,
[ 0., 175., 0., ..., 0., 0., 63.],
[ 0., 75., 0., ..., 0., 0., 22.],
[ 0., 0., 0., ..., 0., 0., 1.]]]),
'labels': array([9., 9., 9., ..., 2., 2., 2.])}x = data['images']
y = data['labels']x.shape, y.shape((28, 28, 18724), (18724,))resolution = 28
classes = 10
x = np.transpose(x, (2, 0, 1))
print(x.shape)
x = x.reshape( (-1, resolution, resolution, 1) )(18724, 28, 28)# sample, x, y, channel
x.shape, y.shape((18724, 28, 28, 1), (18724,))- 데이터 살펴보기
rand_i = np.random.randint(0, x.shape[0])

plt.title( f'idx: {rand_i} , y: {"ABCDEFGHIJ"[ int(y[rand_i]) ]}' )
plt.imshow( x[rand_i, :, :, 0], cmap='gray' )
plt.show()
rows = 5
fig, axes = plt.subplots(rows, classes, figsize=(classes,rows))

for letter_id in range(classes) :
    letters = x[y==letter_id]      # 0부터 9까지 각 숫자에 맞는 array가 letters에 들어간다.
    letters_len = len(letters)

    for row_i in range(rows) :
        axe = axes[row_i, letter_id]
        axe.imshow( letters[np.random.randint(letters_len)], cmap='gray', interpolation='none')
        axe.axis('off')
Data Preprocessing
- Data split
- training set : test set = 8 : 2
- 재현을 위한 난수 고정 : 2024
from sklearn.model_selection import train_test_split

train_x, test_x, train_y, test_y = train_test_split (x, y, test_size = 0.2, random_state=2024)
train_x.shape, train_y.shape((14979, 28, 28, 1), (14979,))- Scaling
- min-max scaling
train_x.max(), train_y.min()(255.0, 0.0)train_x = train_x / 255.0
test_x = test_x / 255.0# train_x = (train_x - train_x.min()) / (train_x.max() - train_x.min())
# test_x = (test_x - test_x.min()) / (test_x.max() - test_x.min())- One-hot encoding
len(np.unique(train_y))10from keras.utils import to_categorical
train_y = to_categorical(train_y, 10)
test_y = to_categorical(test_y, 10)- Data shape 재확인
len(np.unique(train_y)), train_y.shape, test_y.shape(2, (14979, 10), (3745, 10))Modeling : CNN
- 조건
- Sequential API, Functiona API 중 택일.
- 이 구조를 미니 버전으로 활용해봐도 좋다.
- DropOut, BatchNormalization 등의 기능도 같이 활용해보자.
- Early Stopping을 사용할 것.
- Sequential API
train_x.shape(14979, 28, 28, 1)import keras
from keras.models import Sequential
from keras.utils import clear_session
from keras.layers import Flatten, Dense, BatchNormalization, Dropout,Conv2D, MaxPool2D, Input
from keras.callbacks import EarlyStopping
from keras.models import Modelclear_session()
model = Sequential()
model.add(Input(shape=(28,28,1)) )
model.add(Conv2D(filters=64,
kernel_size = (3,3),
strides = (1,1),
padding = 'same',
activation='relu'))
model.add(Conv2D(filters=64,
kernel_size = (3,3),
strides = (1,1),
padding = 'same',
activation='relu'))
model.add(MaxPool2D(pool_size = (2,2),
strides = (2,2)))
model.add(BatchNormalization())
model.add(Dropout(0.25))
model.add(Conv2D(filters=128,
kernel_size = (3,3),
strides = (1,1),
padding = 'same',
activation='relu'))
model.add(Conv2D(filters=128,
kernel_size = (3,3),
strides = (1,1),
padding = 'same',
activation='relu'))
model.add(MaxPool2D(pool_size = (2,2),
strides = (2,2)))
model.add(BatchNormalization())
model.add(Dropout(0.25))
model.add(Flatten())
model.add(Dense (4096,
activation='relu') )
model.add(Dense (4096,
activation='relu') )
model.add(Dense ( 4096,
activation='relu') )
model.add(Dense ( 10,
activation='softmax') )
model.summary()
- Functional API
keras.utils.clear_session()

il = keras.layers.Input(shape=(28, 28, 1))

hl = keras.layers.Conv2D(64,3,1,'same', activation = 'relu')(il)
hl = keras.layers.Conv2D(64,3,1,'same', activation = 'relu')(hl)
hl = keras.layers.MaxPool2D(2,2)(hl)
# hl = keras.layers.BatchNormalization()(hl)
# hl = keras.layers.Dropout(0.25)(hl)

hl = keras.layers.Conv2D(128,3,1,'same', activation = 'relu')(hl)
hl = keras.layers.Conv2D(128,3,1,'same', activation = 'relu')(hl)
hl = keras.layers.MaxPool2D(2,2)(hl)
# hl = keras.layers.BatchNormalization()(hl)
# hl = keras.layers.Dropout(0.25)(hl)

hl = keras.layers.Flatten()(hl)
hl = keras.layers.Dense(4096, activation = 'relu')(hl)
hl = keras.layers.Dense(4096, activation = 'relu')(hl)
hl = keras.layers.Dense(4096, activation = 'relu')(hl)
ol = keras.layers.Dense(10, activation = 'softmax')(hl)

model = keras.models.Model(il, ol)

model.summary()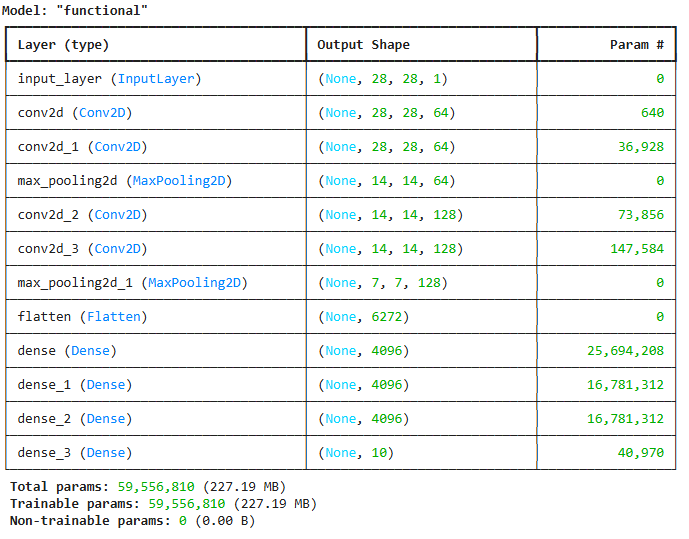
- Early Stopping
model.compile(optimizer = 'Adam', loss = 'categorical_crossentropy', metrics=['accuracy'])
es = EarlyStopping(min_delta = 0, patience = 5, verbose = 1, restore_best_weights=True)- .fit( )
model.fit(train_x, train_y, validation_split=0.2, epochs=500, callbacks = [es], verbose=1)Epoch 1/500
375/375 ━━━━━━━━━━━━━━━━━━━━ 14s 26ms/step - accuracy: 0.6866 - loss: 0.9292 - val_accuracy: 0.8935 - val_loss: 0.3633
Epoch 2/500
375/375 ━━━━━━━━━━━━━━━━━━━━ 7s 18ms/step - accuracy: 0.9309 - loss: 0.2448 - val_accuracy: 0.9239 - val_loss: 0.2428
Epoch 3/500
375/375 ━━━━━━━━━━━━━━━━━━━━ 10s 19ms/step - accuracy: 0.9446 - loss: 0.1867 - val_accuracy: 0.9276 - val_loss: 0.2224
Epoch 4/500
375/375 ━━━━━━━━━━━━━━━━━━━━ 10s 19ms/step - accuracy: 0.9548 - loss: 0.1474 - val_accuracy: 0.9396 - val_loss: 0.2094
Epoch 5/500
375/375 ━━━━━━━━━━━━━━━━━━━━ 10s 18ms/step - accuracy: 0.9626 - loss: 0.1243 - val_accuracy: 0.9329 - val_loss: 0.2318
Epoch 6/500
375/375 ━━━━━━━━━━━━━━━━━━━━ 10s 18ms/step - accuracy: 0.9714 - loss: 0.0956 - val_accuracy: 0.9423 - val_loss: 0.2910
Epoch 7/500
375/375 ━━━━━━━━━━━━━━━━━━━━ 7s 18ms/step - accuracy: 0.9746 - loss: 0.0844 - val_accuracy: 0.9409 - val_loss: 0.2566
Epoch 8/500
375/375 ━━━━━━━━━━━━━━━━━━━━ 6s 17ms/step - accuracy: 0.9784 - loss: 0.0703 - val_accuracy: 0.9362 - val_loss: 0.2444
Epoch 9/500
375/375 ━━━━━━━━━━━━━━━━━━━━ 10s 17ms/step - accuracy: 0.9824 - loss: 0.0579 - val_accuracy: 0.9429 - val_loss: 0.3189
Epoch 9: early stopping
Restoring model weights from the end of the best epoch: 4.
<keras.src.callbacks.history.History at 0x7b70f31dd4b0>- .evaluate( )
loss, accuracy = model.evaluate(train_x, train_y, verbose=0)

print(f"Test Loss: {loss}, Test Accuracy: {accuracy}")
Test Loss: 0.11637604981660843, Test Accuracy: 0.9638159871101379- .predict( )
y_pred = model.predict(test_x)118/118 ━━━━━━━━━━━━━━━━━━━━ 1s 5ms/step# 원핫 인코딩 한 것을 다시 묶어주는 코드
# 평가 지표 및 실제 데이터 확인을 위해 필요
y_pred_arg = np.argmax(pred, axis=1)
test_y_arg = np.argmax(test_y, axis=1)- 평가 지표
from sklearn.metrics import accuracy_score, classification_reportaccuracy_score(test_y_arg, y_pred_arg)0.9471295060080107class_names = ['A','B','C','D','E','F','G','H','I','J']
print( classification_report(test_y_arg, y_pred_arg, target_names=class_names) ) precision recall f1-score support
A 0.95 0.94 0.95 360
B 0.98 0.93 0.96 382
C 0.98 0.93 0.96 385
D 0.92 0.95 0.94 373
E 0.97 0.94 0.96 364
F 0.94 0.98 0.96 392
G 0.92 0.95 0.93 390
H 0.96 0.97 0.96 364
I 0.92 0.93 0.92 360
J 0.94 0.95 0.95 375
accuracy 0.95 3745
macro avg 0.95 0.95 0.95 3745
weighted avg 0.95 0.95 0.95 3745Visualization
- 실제 데이터 확인
letters_str = "ABCDEFGHIJ"

rand_idx = np.random.randint(0, len(y_pred_arg))
test_idx = test_y_arg[rand_idx]
pred_idx = y_pred_arg[rand_idx]
class_prob = np.floor( y_pred[rand_idx]*100 )

print(f'idx = {rand_idx}')
print(f'해당 인덱스의 이미지는 {letters_str[test_idx]}')
print(f'모델의 예측 : {letters_str[pred_idx]}')
print(f'모델의 클래스별 확률 : ')
print('-------------------')
for idx, val in enumerate(letters_str) :
    print(val, class_prob[idx])
print('=================================================')

if test_y_arg[rand_idx] == y_pred_arg[rand_idx] :
    print('정답')
else :
    print('땡')

plt.imshow(test_x[rand_idx], cmap='gray')
plt.show()
- 틀린 이미지만 확인해보기
temp = (test_y_arg == y_pred_arg)
false_idx = np.where(temp==False)[0]
false_len = len(false_idx)
false_len198letters_str = "ABCDEFGHIJ"
rand_idx = false_idx[np.random.randint(0, false_len)]
test_idx = test_y_arg[rand_idx]
pred_idx = y_pred_arg[rand_idx]
class_prob = np.floor( y_pred[rand_idx]*100 )
print(f'idx = {rand_idx}')
print(f'해당 인덱스의 이미지는 {letters_str[test_idx]}')
print(f'모델의 예측 : {letters_str[pred_idx]}')
print(f'모델의 클래스별 확률 : ')
print('-------------------')
for idx, val in enumerate(letters_str) :
print(val, class_prob[idx])
print('=================================================')
if test_y_arg[rand_idx] == y_pred_arg[rand_idx] :
print('정답')
else :
print('땡')
plt.imshow(test_x[rand_idx], cmap='gray')
plt.show()
'AI_딥 러닝_시각지능' 카테고리의 다른 글
| AI_파이썬_시각지능_CNN_SmallSize_notMNIST_2024 (0) | 2024.12.30 |
|---|---|
| AI_파이썬_시각지능_CNN_Image_SmallData2024 (0) | 2024.12.30 |
| AI_파이썬_시각지능_CNN_exercise_CIFAR10_2024 (1) | 2024.12.30 |
| AI_파이썬_시각지능_CNN_exercise_Fashion_MNIST_2024 (0) | 2024.12.30 |
| AI_파이썬_시각지능_CNN_2024 (0) | 2024.12.30 |


